I have been working on this recipe for months now, maybe even a year!
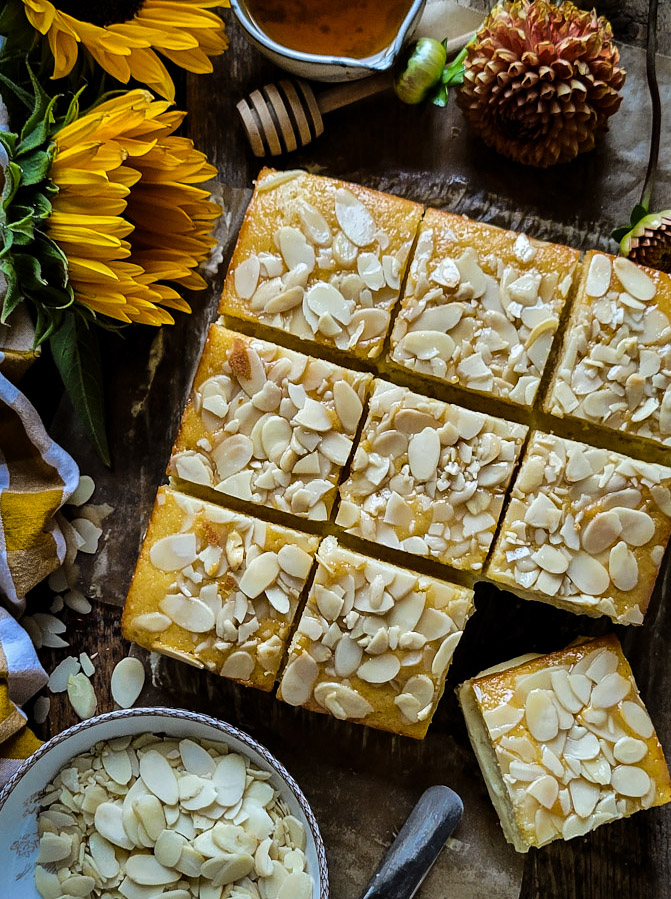
It isn’t that I don’t already have a classic Bienenstich recipe on the blog. I do. It is my mom’s favourite German confection, she would order it from the bakery every opportunity she could. A classic Bienenstich is a brioche based pastry, sliced in half after baking, and filled with a layer of pastry cream. The cake is finished with a honey caramel and almond sliced topping. I am with my mom. it is a sublime little slice of hoeny and vanilla paradise. The name Bienenstich is translated as bee-sting, and pays homage to the honey caramel topping.
But, here is my issue with the classic recipe. I find that after all the work of baking the yeasted and proofed dough for the base of the dessert, it doesn’t take long for it to feel and taste dried out. It is a bread when it all comes down to it. So unless it gets inhaled the first day, it already feels and tastes somewhat stale by day two.
My second issue: the caramel and almond topping once cooled, becomes quite hard. Older recipes never address this issue. So when you go to serve up the cake, and you try to slice the cake, the pressure from the knife trying to get through the caramel layer ends up pushing out the pastry cream filling through the sides, meaning that the creamy middle layer gets reduced, since it is all sitting outside the cake now.
So I am going to address, fix and dare I say, improve on the traditional version!! Here we go.
First Off, the Cake
Instead of a brioche dough which requires yeast, and proofing before it can be baked up, let’s use a classic sponge cake. The flavour of this vanilla cake is wondrous. The texture is moist and tender. It doesn’t dry out, even days after baking. And it takes so much less time in the oven.
Simple ingredients that you probably have on hand right now is all you will need for the cake: butter, sugar, eggs, flour (yes you can substitute a good cup for cup gluten free flour for the the AP flour) baking soda, salt, and vanilla paste or pure extract. You will be adding buttermilk, but feel free to substitute sour milk, or even kefir (my usual go-to, since it is always in the fridge)
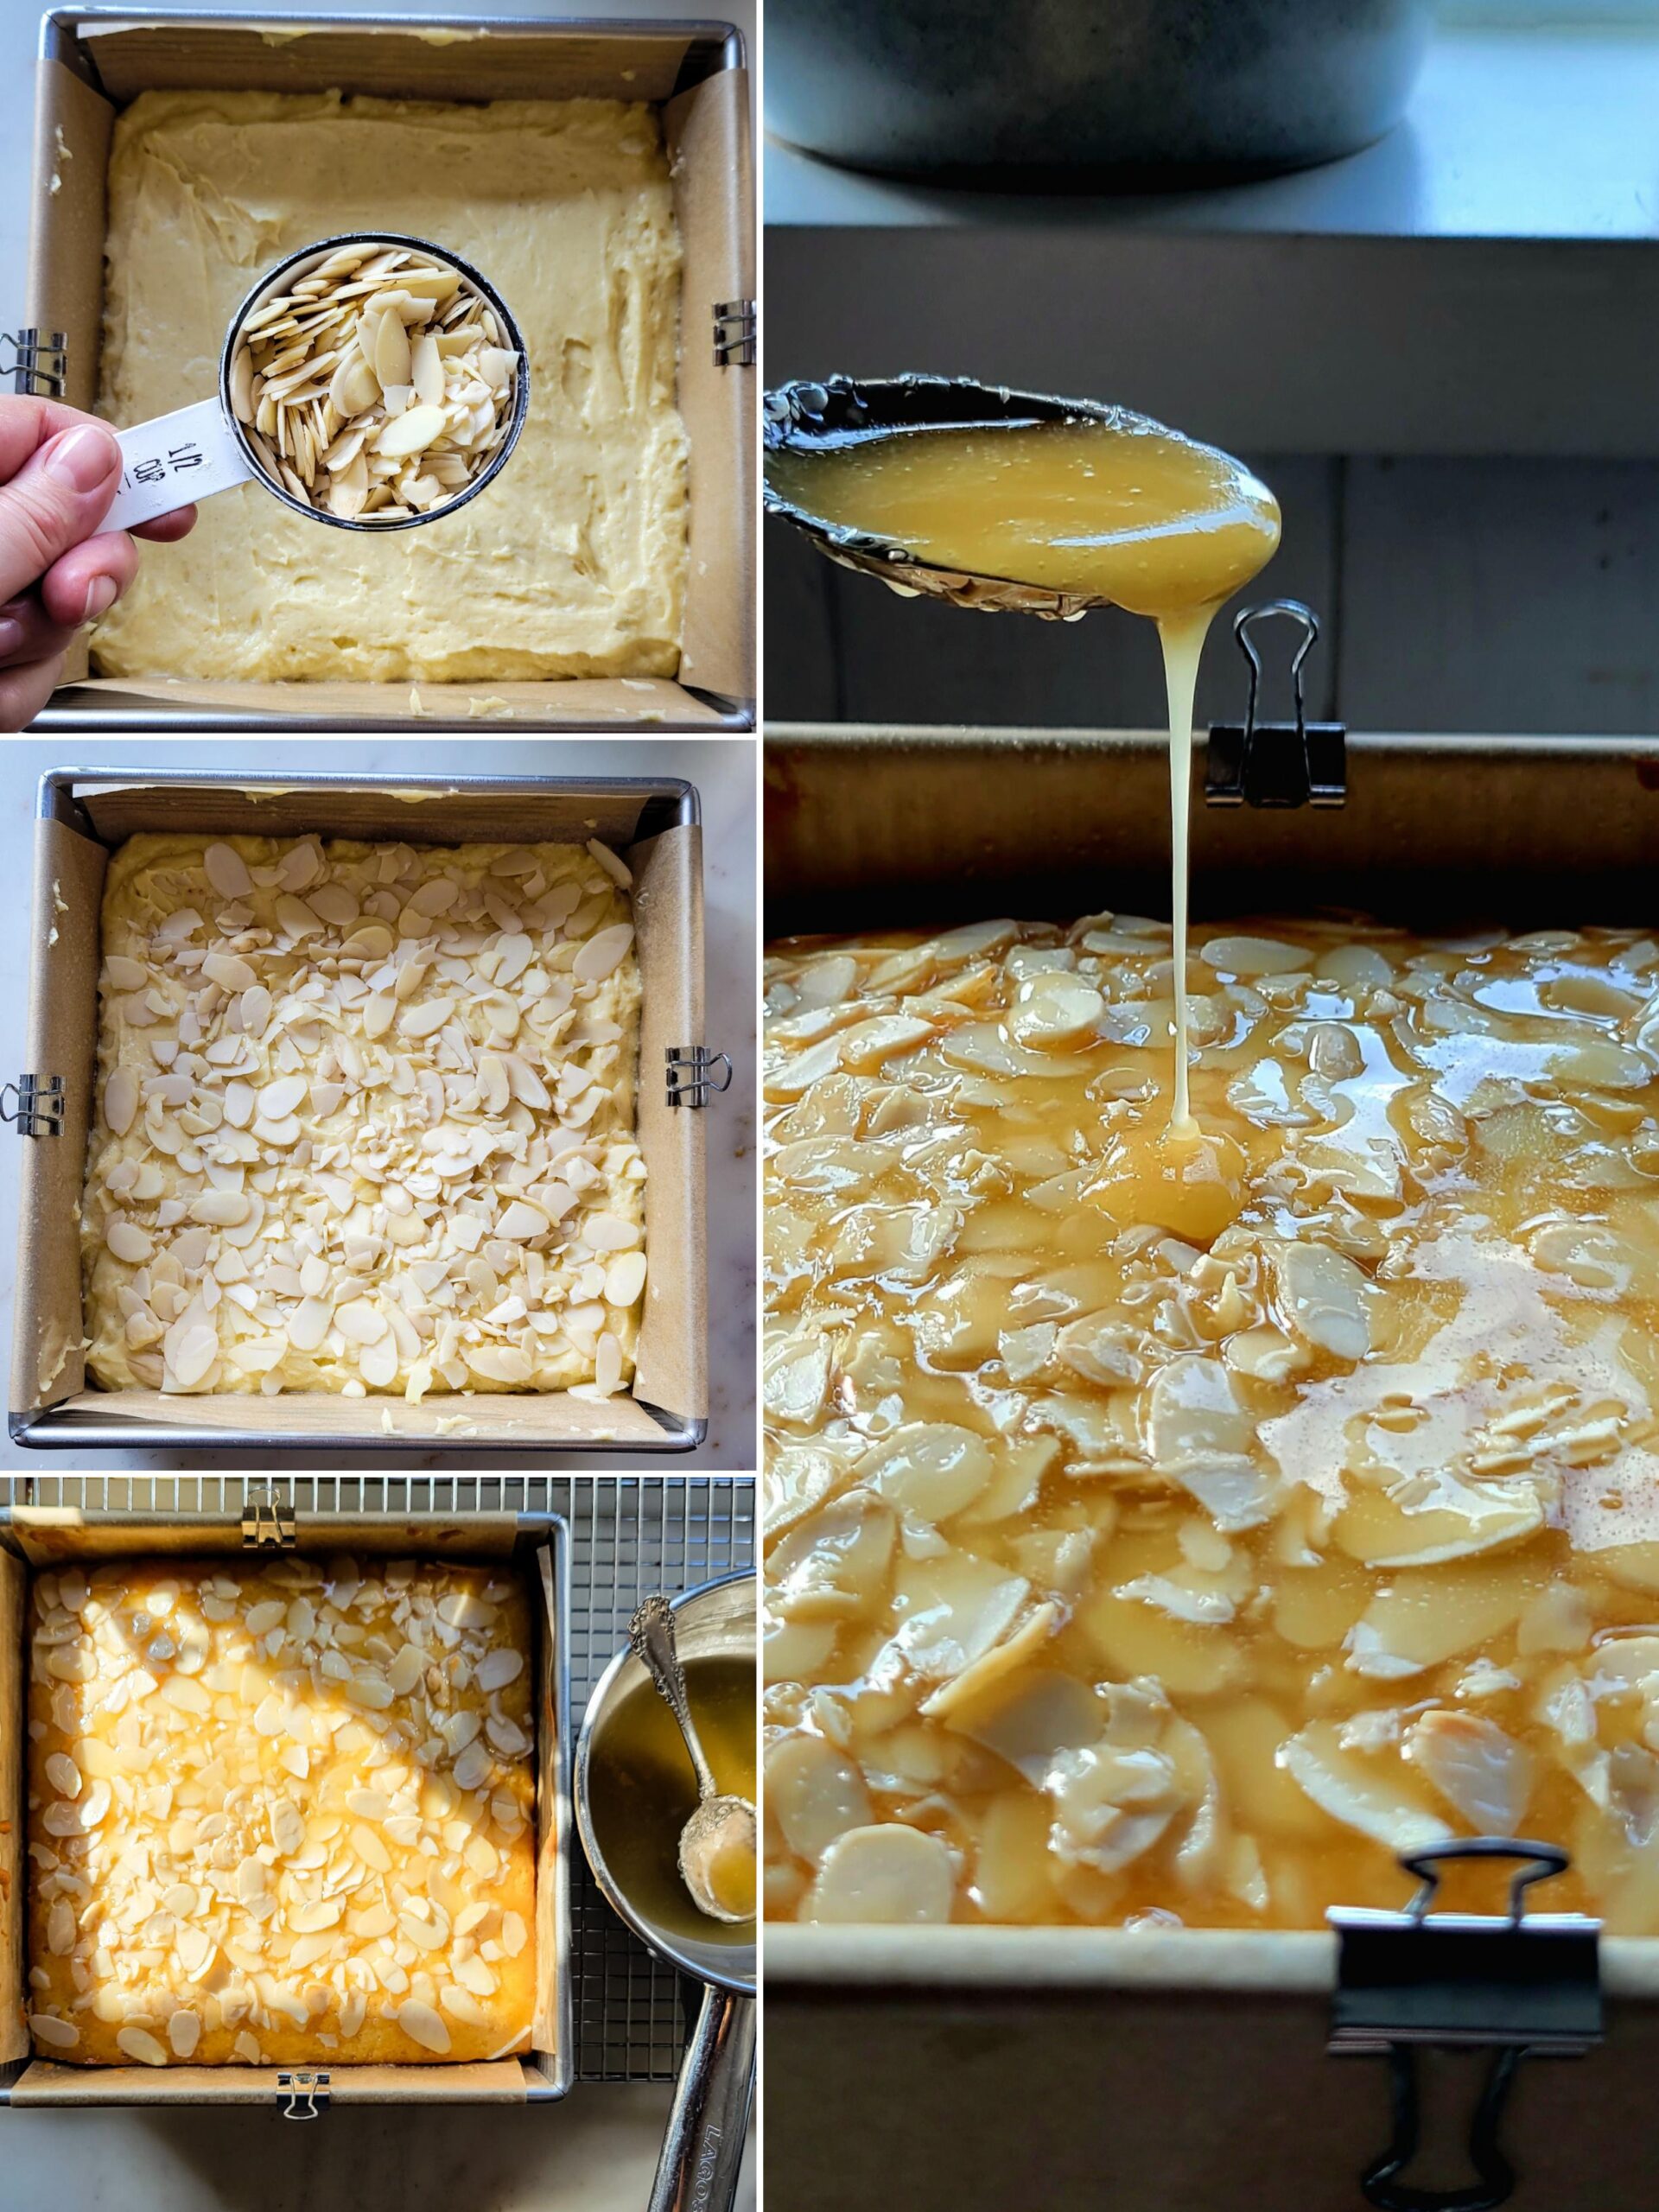
You will whip up the batter in a stand mixer or with a hand held mixer, and then transfer it to a prepared baking pan. I like to use an 8 inch square baking pan, because it will give perfect square clean slices in the end. But it will also work in a 8 or 9 inch round cake pan (it may end up just a little bit thinner) Just before you place the pan into the oven, sprinkle almond slices evenly over the top of the batter.
After baking, place the pan onto a wire rack to cool.
Honey Butter Caramel Sauce
This takes just a few minutes in a small pan over low heat to warm through. It is a combination of honey, butter and sugar. When melted just whisk to create a smooth sauce. This will get drizzled evenly over the baked cake as it cools.
The Pastry Cream
This pastry cream is so good, I can eat it with a spoon. It is really a firm vanilla pudding combined with sweetened whipped cream. Once smooth, it becomes a pleasant vanilla cream with some beautiful body. Save this recipe, the pastry cream is a good lesson in how to make a classic pudding, and you will use this in so many desserts. Once made, and yes, it can be made in advance, store it in a sealed container in the fridge till needed.
Asssembly of the Bienenstich
Here is where I really stray from the traditional recipe. And I think it is a superior method. Like I mentioned earlier, trying to slice the filled cooled cake can be somewhat messy, thanks to the firm hard caramel top, and the drier bread/cake. It results in pastry cream oozing out all over the sides.
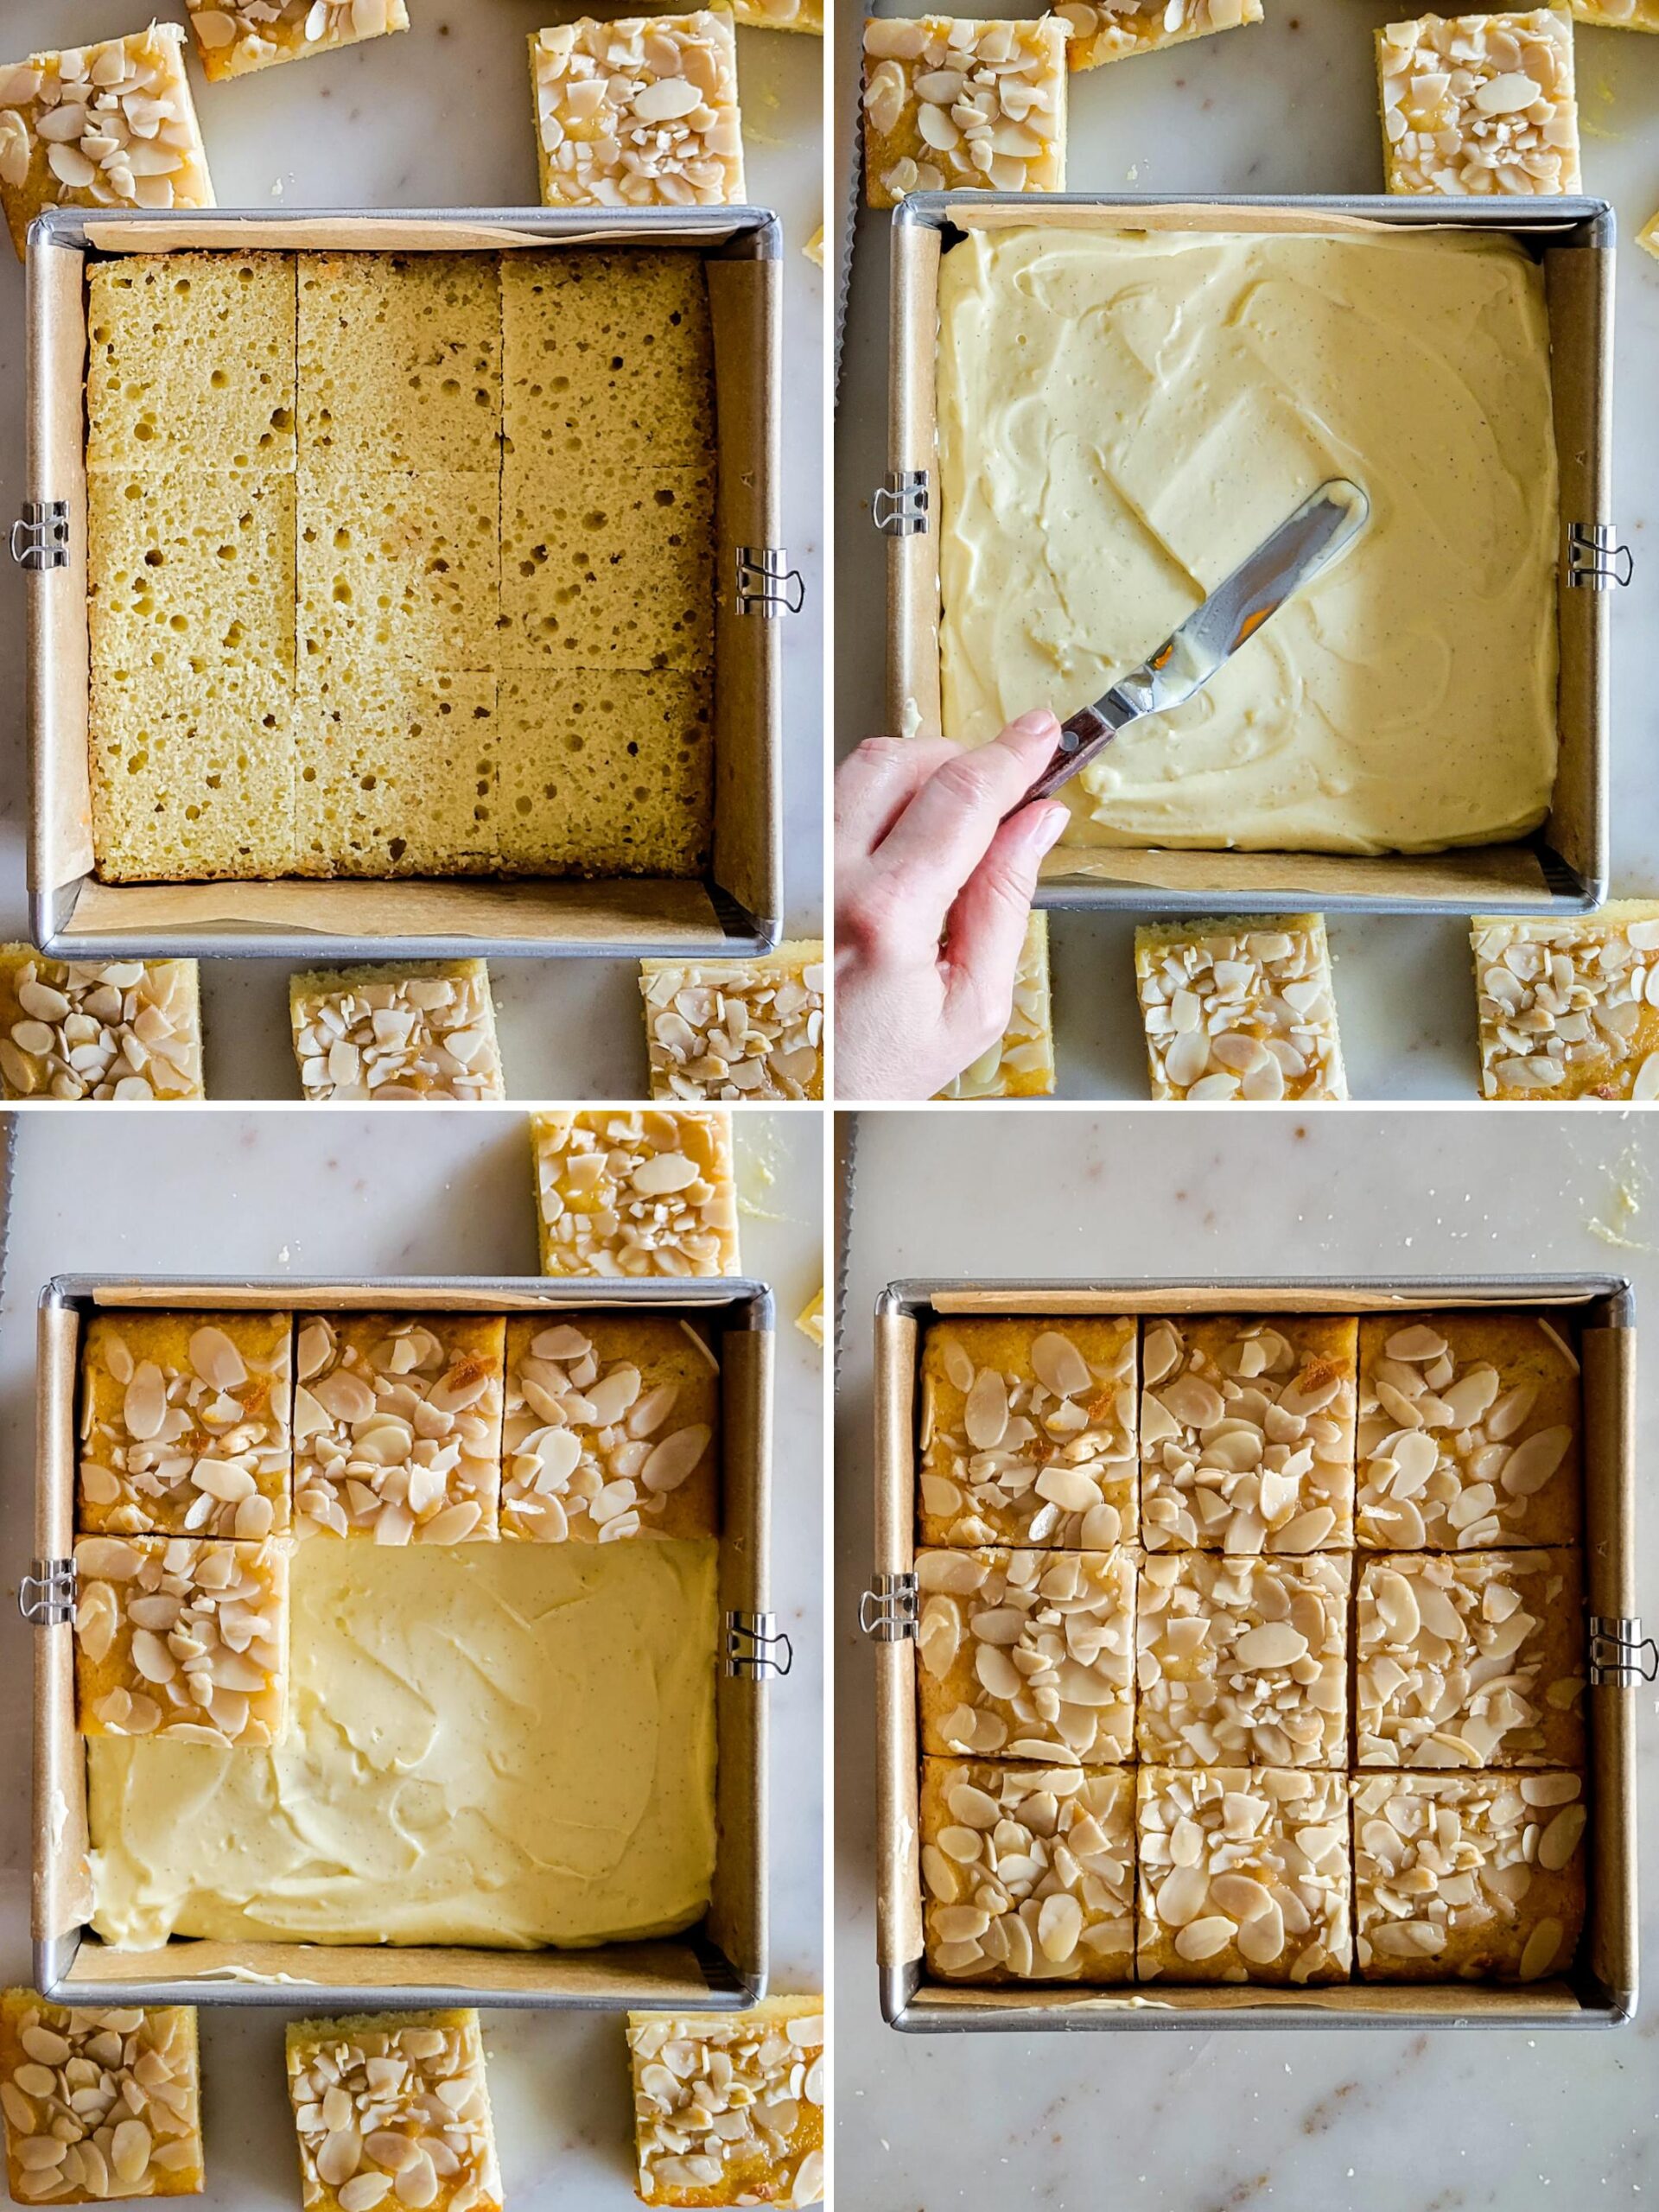
But we can avoid this altogether with some simple pre-slicing slicing! First, you will remove the cooled cake (after covered with the caramel) from the cake pan (placing the parchment paper back into th3 baking pan). Now slice the cake into three even sections when looking down. Then you will cut each of these three long lengths of cake into three. You will now have nine squares of almond and caramel covered cake. Take each square and slice in half horizontally. Try and keep the tops and bottoms in place on the counter, just so that you can place them back together later. Place the bottoms of the cake back into the lined baking pan. Take the cooled pastry cream and spread it evenly over the nine slices of bottom in the cake pan. Top with the corresponding top cake slices. Now return the entire baking pan back to the fridge to help the pastry cream set.
Serving and Final Thoughts
Since you returned the parchment paper liner to the baking pan, you can now use it to lift out the sliced Bienenstich Torte out onto a serving platter or cutting board. You can serve up individual slices on plates with whipped cream, or even sprinkle the entire cake with icing sugar. No knife needed at this point, each serving is already sliced up!
Any uneaten slices can be stored in a sealed container for up to a week in the fridge.
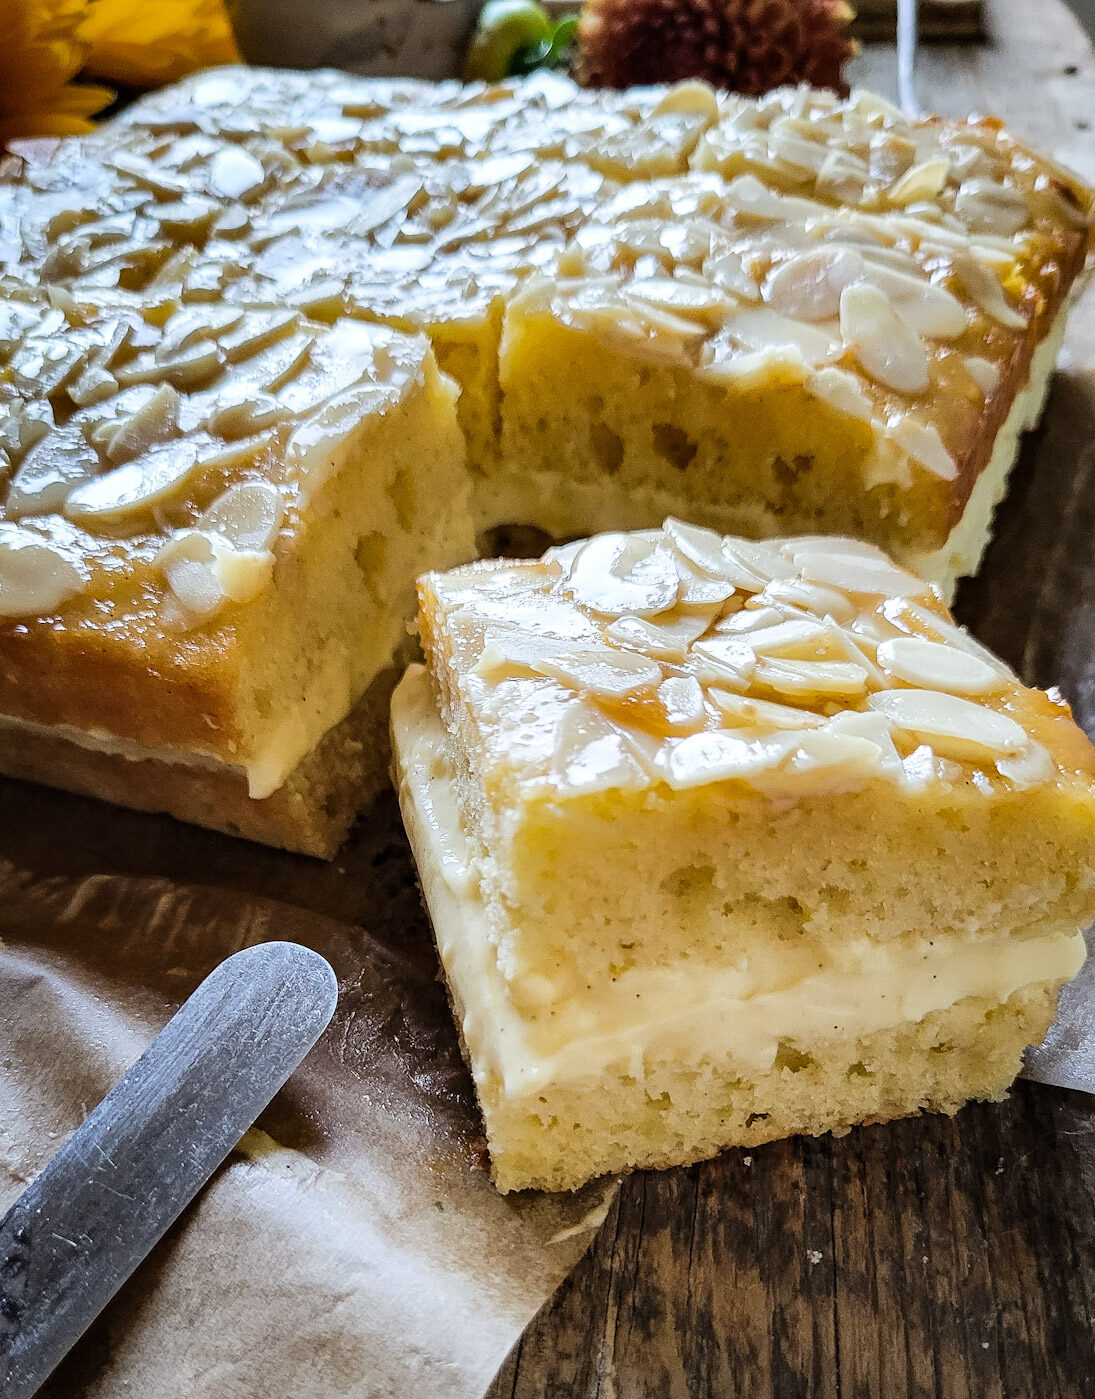
Everyone loves this version. Jim loves it way more than the traditional version (don’t tell my aunts and uncles!) The cake is tender and moist. The flavours of the original is all there, but without the struggle of baking up a yeasted cake, and pre-slicing it makes serving it a breeze!
Yes, you can freeze the cake. You can freeze the unsliced, unfilled version by wrapping it in cling wrap and then foil. You can also freeze individual filled slices, by wrapping them in cling wrap and storing them in a freezer bag or sealed container. Either way, thaw in the fridge overnight before finishing or serving.
For a complete German feast, with this as dessert, check out my Mama’s German Beef Rouladen, Jägerschnitzel, German Rotkohl, Sweet and Sour Red Cabbage, German Potato Dumplings, aka Kartoffelklöse, German Roasted Potato Salad, Kasespätzle, aka German Mac n Cheese,
If you make this easy Bienenstich Spongecake Torte, please be sure to leave a comment and/or give this recipe a rating! It’s always lovely to hear from you guys, and I always do my best to respond to each comment or question. And of course, if you do make this recipe, and you post it on Instagram, don’t forget to also tag me so I can see! Looking through the photos of recipes you all have made is such a treat.
Love Jen
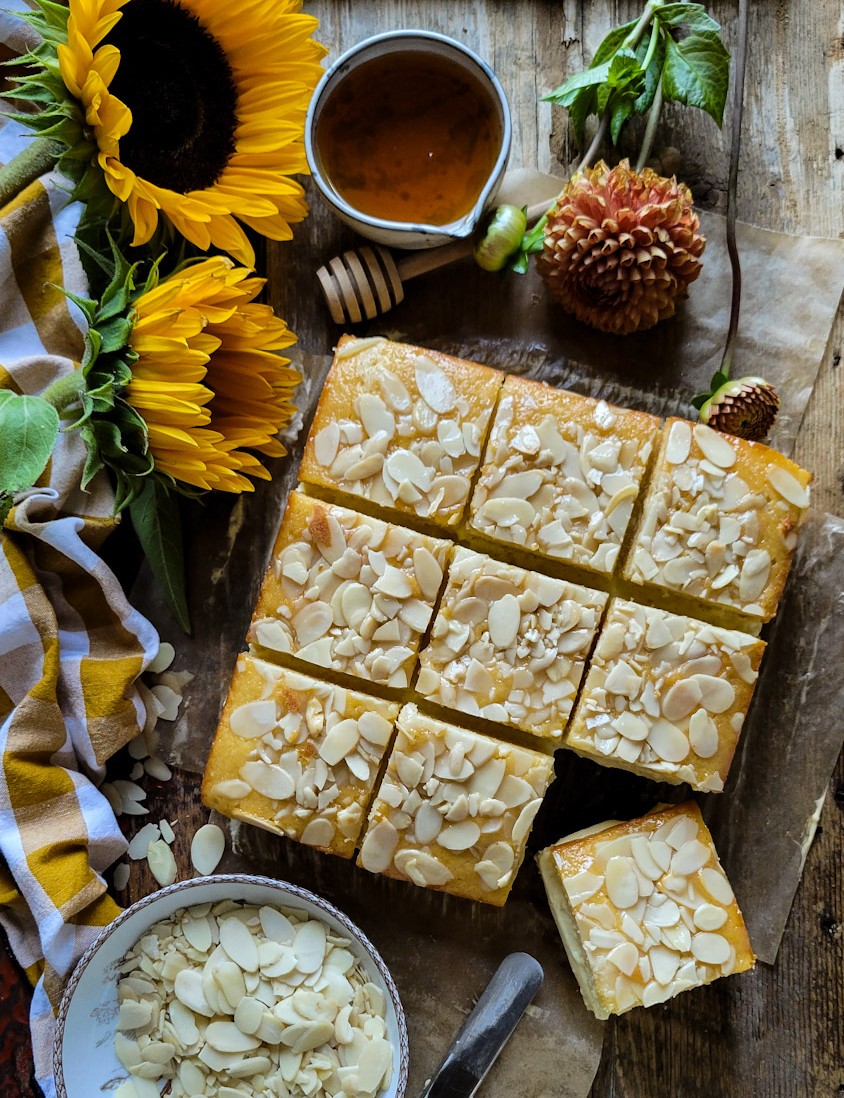

Bienenstich Torte
Ingredients
Vanilla Butter Cake
- 8 tbsp (113 g) unsalted butter at room temperature, plus 1 tbsp for greasing the pan
- 3/4 cup (150 g) granulated sugar
- 2 large eggs at room temperature
- 1 1/2 cups (185 g) all purpose flour, (you can use gf cup for cup flour as well, it will weigh differently, so use the fluff, scoop and level method to fill your measuring cups)
- 1 1/2 tsp (6 g) baking powder
- 1/2 tsp baking soda
- 1/2 tsp kosher salt
- 1/2 cup (120 ml) well shaken buttermilk, can also use sour milk or even kefir
- 1 tsp vanilla paste
- 1/2 cup sliced almonds
Honey Butter Caramel
- 3 tbsp butter
- 3 tbsp honey
- 3 tbsp granulated sugar
Pastry Cream Filling
- 2 cups (455g) whole milk
- 1/2 cup (115 g) granulated sugar
- 4 tbsp (40 g) cornstarch
- 1/4 tsp kosher salt
- Yolks from 4 large eggs, straight from the fridge
- 2 tbsp (30 g) unsalted butter, cut into 1/2-inch cubes
- 2 tsp vanilla paste
- 1 cup (250 ml) whipping cream
- 2 tsp cornstarch
- 2 tbsp icing sugar
Instructions
Vanilla Butter Cake
-
Position the rack in the centre of the oven, and pre-heat to 325F. Line an 8 inch square cake pan with parchment with enough overhang to be able to pull out the cake afterwards.
-
In the bowl of your stand mixer, beat the remaining 8 tbsp butter and sugar together on medium speed with the paddle attachment until light and fluffy, about 2-3 minutes.
-
Add the eggs one at a time, beating well after each addition, scraping down the sides when necessary.
-
In a medium bowl sift together the flour, baking powder, baking soda, and salt.
-
Add half of the sifted flour mixture to the butter mixture and beat on low speed until just combined. Then add all of the buttermilk and vanilla, again beating till well combined, and scraping down the sides as needed. Beat in the remaining flour mixture till smooth.
-
Use a spatula to make sure the mixture in the bowl is well combined, grabbing anything from the bottom that might not have been captured by the paddle.
-
Spoon the mixture into the prepared pan, using a small offset spatula to smooth out the top and getting it even. Scatter the sliced almonds evenly over the top.
-
Bake until the top is golden and springs back if you gently touch it, and a toothpick comes out clean, or with only a crumb or two, about 35-45 minutes depending on your oven. Transfer the pan to a wire rack to cool.
Honey Butter Caramel
-
When the cake is about 10 minutes from being baked through you can start the Honey Butter Caramel.
-
Combine all three ingredients in a small pot and stir over medium heat till starting to bubble. Once smooth and thickened nicely, you can remove from the heat. Feel free to reduce the heat to medium low if it is bubbling too much.
-
Once the cake has sat out on the wire rack for a couple of minutes, you can spoon the honey caramel evenly over the the almond crusted top.
-
Let the cake cool completely. This can be made the evening before you want to serve the cake.
-
Once completely cooled, use the parchment to raise the cake out of the pan, but don't discard the parchment paper. Return the parchment paper to the baking pan.
-
Using a very good serrated knife, cut two even slices (creating three sections) through the cake. Then turn the cake and repeat. This will give you nine squares.
-
Now you will use the knife to cut each square in half so that there is a bottom and an almond crusted top. Place each bottom of each cake slice back into the parchment lined baking pan. Try and keep the tops and bottoms together, it will just guarantee that each one will fit back in correctly without any trouble.
-
Now spoon the Pastry Cream evenly over all the bottom layers set back in the pan. There is more pastry cream than you will need for this recipe: I end up using a little more than half. See Notes on what to do with the remaining.
Place each almond crusted top over the cream till all the tops are back where they belong on the cake. Now you can take the baking pan and set it in the fridge to help set the pastry cream.
-
When ready to serve, use the parchment paper to lift out the sliced cake square out onto a cutting board. If needed, use an offset spatula or knife to slide between each square, easily separating them, since they are already cut. Serve and enjoy with coffee!
Pastry Cream, can be made the day before
-
In a large bowl, set up an ice bath by partially filling it with a combination of cold water and ice. Set aside.
-
Heat the milk in a medium sauce pan over medium heat till just warmed through. Remove from the heat before it starts to steam.
-
Meanwhile, in a medium heatproof mixing bowl set on top of a dampened towel (this serves as a stable base), stir together sugar, cornstarch, and salt. Whisk in egg yolks until mixture is pale yellow, smooth, and fluffy, about 1 minute.
-
While whisking continuously, slowly pour a small amount of the milk into egg yolk mixture in a thin stream. Then add more milk, whisking until all of it has been added.
-
Return the mixture to the same saucepan. Cook over medium heat, whisking constantly until pastry cream begins to thicken, about 5 minutes. Once it thickens, continue to whisk, pausing every few seconds to check for bubbles, about 1 minute. When it begins to bubble, set a timer and continue whisking for 1 minute. This step is important to neutralize a starch-dissolving protein found in egg yolks.
-
Off-heat, whisk in butter until melted and thoroughly combined. Then whisk in the vanilla paste. If you sense any lumps, strain the pastry cream through a fine-mesh sieve set over a heatproof medium bowl. Immediately place plastic wrap or buttered parchment paper directly on the surface of the cream to prevent a skin from forming. Transfer bowl to prepared ice bath to chill for 30 minutes, then refrigerate until cold, about 2 hours.
-
When you are ready to assemble the cake, pull the pastry cream from the fridge to loosen up. Use a whisk to completely loosen it, removing as many lumps as possible, so that it will easily blend into the whipped cream (next step)
-
Using a handheld mixer, mix the whipping cream in a large bowl at low speed. Slowly increase the speed to medium and whip till starting to thicken.
-
Add the cornstarch and icing sugar, and continue whisking till you have achieved very firm peaks.
-
Spoon in about 1/4 cup of the whisked pastry cream into the whipped cream and fold it through till smooth. Continue adding the pastry cream in portions till you have one smooth bowl of combined whipping and pastry cream. Place this in the fridge while you slice up the cake.
-
Proceed with the cake instructions above.
Recipe Notes
Leftovers can be stored in a sealed container (or even the baking pan sealed lightly with cling film and stored in the fridge for up to four days. If well wrapped, these squares can also be stored in the freezer!
To make sour milk, just add 1 tbsp of lemon juice or white vinegar to a cup of whole milk and let it sit for 15 minutes. Then it is ready to use if you don't have buttermilk or kefir on hand.
You can also use an 8 or 9 inch springform pan for baking the cake. Once cooled, you will slice it into wedges, and then follow the rest of the directions. You may find that the cake is thinner using a 9 inch springform pan, but it will still work.
This Pastry Cream recipe will give you more than you need for this cake, you may have just under half leftover, depending on how thick you layer it between the cake. Honestly, you could make less, but it makes for a great little dessert on its own, layered with fresh chopped fruit!

Hey Jen 🙂 Can this be made the day before? I need a second dessert, but don’t want to be baking on Thanksgiving day—-what do you think? Too dry to serve next day?
~Jodi
Hi Jodi, most definitely. You can bake the cake even earlier. But if you have the cake baked and cooled, and the pastry cream set, then go ahead and assemble. Keep the parchment lining in the pan, lay out the bottom layer, spread out the pastry cream, and top with the almond covered slices. Place it the pan in the fridge. Gently drape cling film over, The next day you can use the parchment to pull everything out. Then separate the slices onto a platter!
I will be baking this tomorrow. I was thinking there must be someone out there that did it with a sponge base. And voila I’m here. I don’t like the yeast version. Especially if I’m the one baking since I have no stand mixer let alone a hand mixer. I will use a whisk and see where it takes me. Love and hugs from Türkiye!
Hi Asya, Yes, I agree, I’m not at all attracted to the yeasted version. So happy you found my recipe. Hope it turned out well for you. Enjoy, Love Jen
This looks delicious cant wait to make it Love your detailed instructions and tips Thank you
Hi Carol, enjoy, it is such a lovely version, I like it so much more than the traditional more fussy method.
Hi, trying the recipe for the first time and im super excited. But I just wanted to note that there is a typo for the grams of butter in the cake. 8tbs is 113 grams 🙂 not 13grams.
can you double the recipe and cook in 11×13 pan?
Hi Molly, I think it should work just fine. I haven’t done it yet, but if the opportunity arises that I need to, I would definitely be doing hte same thing. Hope this helps, Love Jen
I think there is a typo in the sponge that affects those of us using metric measurements, eight tablespoons of butter is 113g not 13g.